Details of Courses
Civil 3D Highway Design - Basics
Teacher :GCE Admin
Review :

Price :$ 0.00
Highway Design with Autodesk Civil 3D software is in demand globally and a good understanding of the Civil 3D software plus knowledge of design standards can surely help engineers to fast track their career as highway design engineers.
Our Civil 3D course modules are designed to cover all key aspects of design right from getting started with opening window, familiarity with tools, dropdowns, etc to importing ground survey data, horizontal alignment design, vertical alignment design, assembly creation, corridor modelling, and generating final 3D model outputs.
-
The first module starts with getting started with the Civil 3D start-up window, quick access toolbar, dropdown option settings, etc. The module then opens the Civil 3D metric template and explains all the ribbons such as ground data, design data, profiles, etc. Civil 3D is template-based software, therefore templates are created and saved in tool space pallets and course all the menu options of the pallet. The module also covers drawing setting, unit transformation, object layers, etc.
-
The second module covers importing ground survey data into Civil3D. the module covers three types of data importing methods (topo survey, land XML, and lidar coordinates (x,y,z)). When importing a CAD file, first all layers are isolated and then imported to Civil3D. The module explains the land XML and lidar data transfer process in a detailed manner. After transferring data, the module demonstrates how to create the ground surface model.
-
The third module demonstrates how to analyze the surface, refine the surface and remove the errors like null levels, zero levels, etc. Then it covers how to trim falls surface area that sits outside the project road boundary. The module demonstrates how to create different surface types using tool pallets e.g contours, ground surface, etc, and finally how to check the ground level, profile and sections dynamically.
-
The fourth module commences with horizontal alignment design in Civil 3D and covers 4 types of horizontal alignment design i.e centreline alignment, offset alignment, curve return alignment and miscellaneous alignment. Create alignment from the layout or predefine polyline or import the alignment from other software or file. The module also covers the quick alignment design method and setting the line style, curve style, transition style, point style, etc.
-
The fifth module covers alignment design with Element Method. The module demonstrates fixed tangent, floating curve with transition length, fixed curved with transition length, fillet curve and reverse curve design for various design speed criteria. The module demonstrates some tips to minimize abortive work (when the amendment is needed) when designing it with the element method.
-
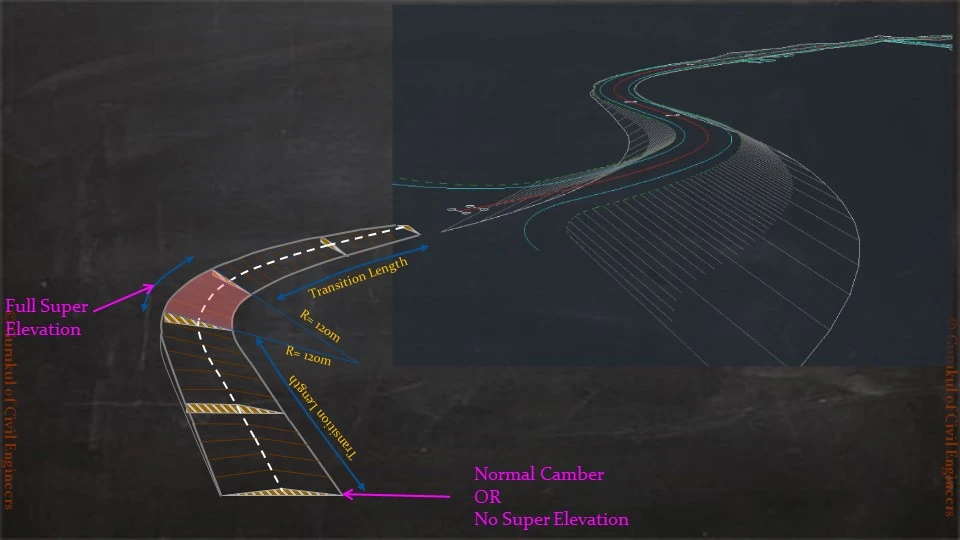
The sixth module explains the vertical design process of the proposed centreline. For that, first, we import the ground model land XML and then start the profile creation process. The module describes how to fix the setting of the profile creating window. The vertical profile can be created by the quick method and element method. Both methods are described methodically for easy understanding. The module also explains how to set the profile band to show chainage, ground levels, proposed road levels, superelevation, etc.
-
The seventh module describes how to create an annotation for the profile drawing production and how to make them in a presentable format. It shows how to show curves and gradients details within the profile section and how to create bands at the lower section showing chainage, proposed levels, ground levels, superelevation, horizontal alignment details, vertical alignment details, etc. The module also covers how to change grid style, font style, line type, datum levels, etc
-
The Eighth module describes the process of creating cross-sections on the 3D model. Here module starts with assembly creation and it demonstrates two types of assemblies, dual carriageway assembly (without central median) and dual carriageway assembly (with central median). It demonstrates how to create assemblies from tool pallets.
-
The ninth module describes the process to review and analyzing the corridor. It explains how to visualize the corridor against cross-section assemblies, how to fix the errors in the corridor, and how to make it in a presentable format.
-
The tenth module described how to create retaining walls profiles in place of the embankment and describes how to generate cross-sections from the design model.
| 1. Welcome to Online Exam for Civil 3D Highway Design - Basics
2. Total Time for Exam is 60 Minutes 3. No Negative Marking Best of Luck for your Exam |
| Exam available after course completion |

GCE Mentors admin
GCE Mentor is a group of Civil Engineering experts from the industry. Mentors prepare, compile the course content and review it before publishing. Several iteration and value addition takes place before publishing the course. It is vital for Mentors to not only make the course engaging but also provide important and advance information to GCE Students. We would encourage to GCE students to please share their feedback of every course module as they progress the course. Your valuable input will not only improve our current courses, it will also help us to understand Student’s perspective so that we can improve our upcoming course modules.
0
No Ratings